/body> >

Wednesday 29 April 2020

Barnyard Millet Idli / Diabetic Friendly Recipe


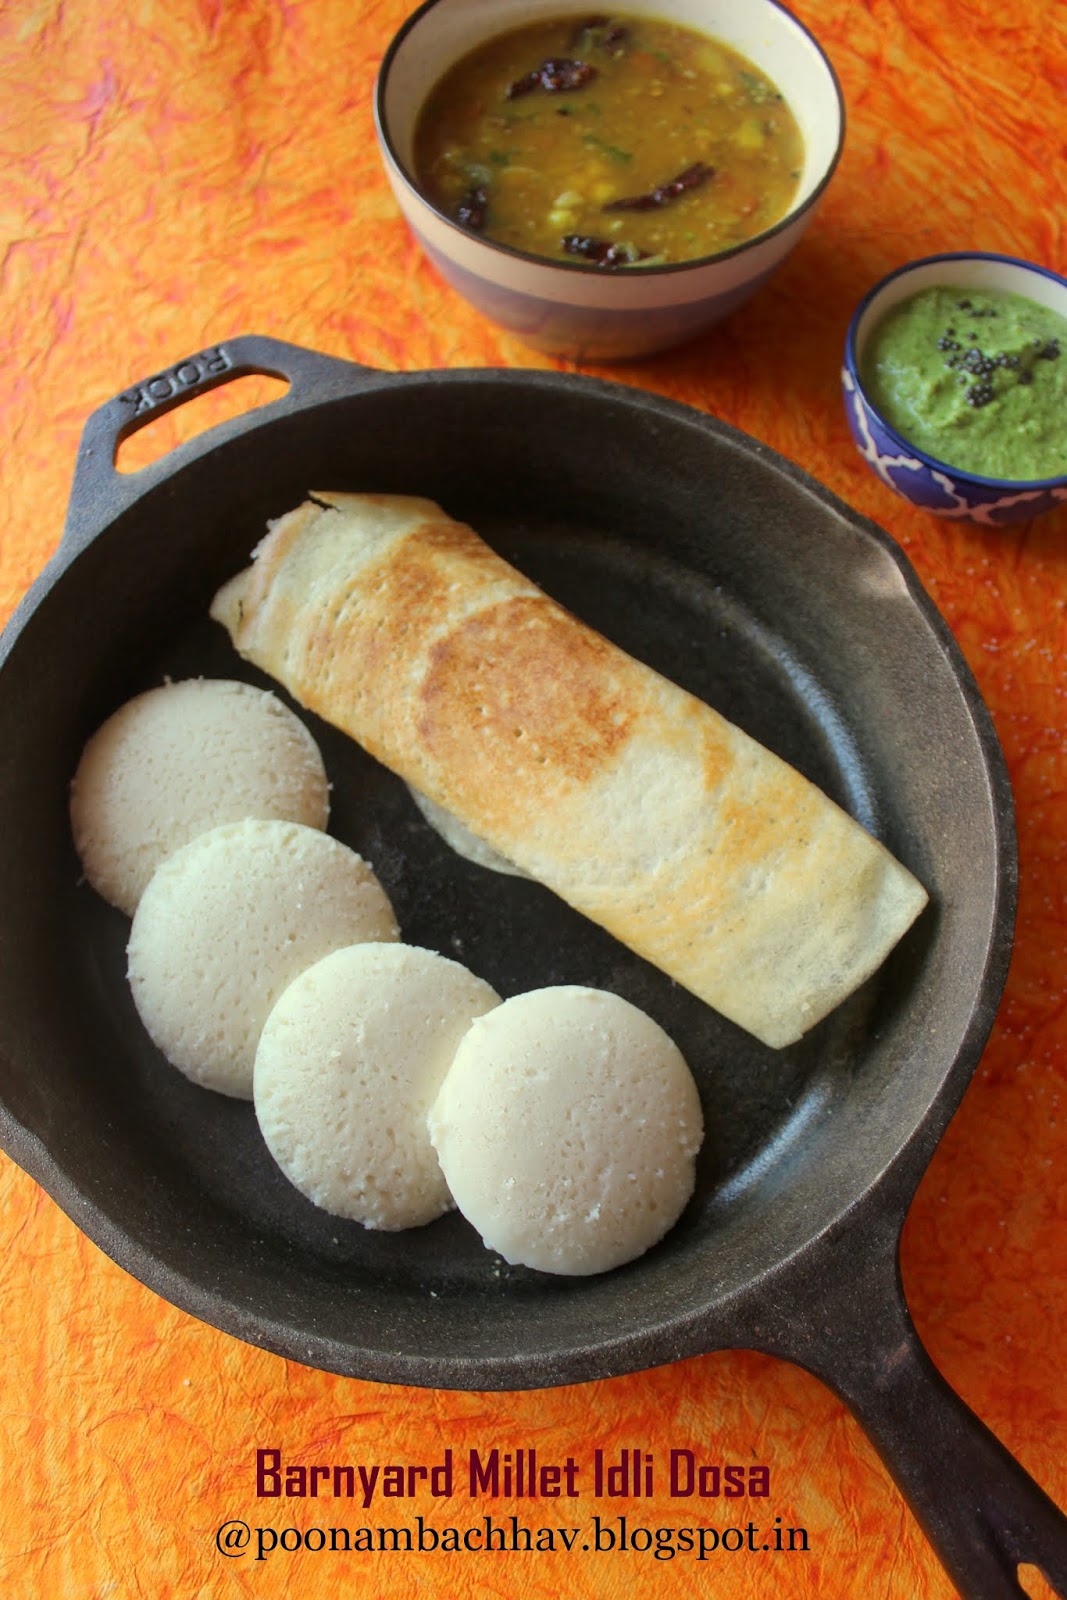
Barnyard Millet idli is a healthy and delicious variation to the regular rice idli. Here, as the name suggests, Barnyard millet (also known as Kuthiraivali in Tamil, Vari che Tandul in Marathi, Sama Chawal in Hindi, Moraiyo in Gujarati) is used instead of rice to make idli. Fermented Idlis made using barnyard millet and skinned black gram ( urad dal) are soft and fluffy with added nutritional benefits of millet. These gluten-free and vegan idlis are low in calories and rich in fiber hence diabetic friendly and perfect for weight watchers. Serve Barnyard millet idli with Sambar and Coconut chutney as breakfast or brunch. You can also make crisp dosa using the same batter.


What is Barnyard Millet ?

Barnyard Millet (Echinochloa frumantacea) is a wholesome grain that is is a gluten-free, low glycemic food, low in calories, rich in fiber, and a good source of iron, phosphorous and calcium. It has 6 times more fiber than wheat, making it an ideal weight loss millet. Barnyard millet tastes almost similar to broken rice when cooked. It is economical and easily available in India and makes tasty food for all age groups. It is called Shyama in Bengali, Vari che Tandul/ bhagar in Marathi, Moraiyo in Gujarati, Sama ke chawal in Hindi, Oodalu in Kannada, Udalu in Telugu and Kuthiraivally in Tamil. Cereal grains are not consumed during fasts in India, so barnyard millet is a popular ingredient during fasting. many food preparations can be made with it and one should not restrict it to just fasting food.
                         

What all goes into my Barnyard Millet Idli?

Barnyard Millet Idli is just like the regular rice idli and requires just 4 ingredients. The only difference is that in this case, Barnyard millet replaces rice. This is not an instant recipe, which means this idli requires soaking, grinding, and fermentation process before the idlis are being steamed. The second ingredient of this idli is split and skinned black gram (urad dal). The ratio of barnyard millet to black gram is 2:1. I also soaked a few fenugreek seeds along with the black gram. Both millet and black gram are soaked in water separately for 4-5 hours after which they are ground to a smooth batter. Salt is added to the batter and allowed to ferment overnight. The fermented batter is then added to greased idli molds and steamed for 20 minutes. Soft, fluffy idlis are ready to serve. I even tried making dosa from the same fermented batter and as you can see in the pic below, the dosa is crisp and has come out perfectly.

Barnyard Millet Video Recipe


Barnyard Millet idli is 
  • Diabetic-friendly
  • Figure friendly
  • Kids-friendly
  • Vegan
  • Gluten-free
  • Saatvik (onion-garlic free)
  • Serves as a healthy baby food
Serving Suggestions:

Barnyard millet idli tastes best when served hot with Coconut chutneySambar, or Sesame Seeds podi. Though it makes for a healthy and filling breakfast, these idlis can also be served at lunch, dinner, or in the lunch box.


Related Event:

It is month-end and time to post for my Facebook gourmet group, Shhhhhh Cooking secretly challenge. This group was started by Priya's versatile recipes and taken further to date by Mayuri di. Mayur di's Farali dhokra is on my to-do list which uses barnyard millet and sago to make a delectable snack. The theme for this month was suggested by Aruna as Millet Magic. She has many healthy millet dishes on her blog. Her Ragi Puttu and Multigrain banana bread that uses finger millet recipes are worth trying. In this group, each member takes turns to propose the theme for the month. All participating members are divided into pairs and both partners exchange a set of secret ingredients using which both have to prepare a dish as per the theme. The other members of the group then take turns to guess the two secret ingredients just by looking at the pic of the dish. Doesn't all this sound interesting! If you are a food blogger and wish to join this group, do let us know in the comment section below. My partner for this month was Preethi di. She gave me barnyard millet and fenugreek seeds as my two secret ingredients and i made this healthy idli using them. In return, I gave her Foxtail millet flour and curd and she made Foxtail millet mini rotti using those ingredients. Docheck our her healthy Mixed millet porridge mix as well.

                              चित्र में ये शामिल हो सकता है: पाठ

Preparation Time: 12 hours
Cooking Time: 20 minutes per batch
Serves: 2  dozen idlis

Ingredients: Measurements used 1 cup = 240 ml
  • 2 cups barnyard millet
  • 1 cup split and skinned black gram/urad dal
  • 1 tablespoon fenugreek seeds/methi dana
  • Salt to taste
Method:
  1. Rinse the barnyard millet and soak it in enough water for 4 hours. In another bowl, take rinsed black gram and add fenugreek seeds to it. Soak it also in enough water for 3-4 hours.


2. After the soaking time, transfer the black gram and fenugreek seeds to a mixer grinder jar with little water and grind to a smooth paste. remove the paste in a large vessel.


3. Now drain the barnyard millet and add it to the same grinder jar. Grind it also to a coarse paste without adding any water. Soaked barnyard millet does not require any additional water while grinding. If you add additional water, you won't be able to grind it properly and thus not get the desired consistency and texture of the batter. add this ground barnyard to the black gram paste and blend the batter well. Add salt to taste and give a good mix. The idli batter before fermentation should not be too thick or too runny. It should be smooth and of dropping consistency.


4. Cover the vessel and place it in a dark and warm place undisturbed for 6-8 hours or overnight. The batter will ferment and rise in volume. You can see small air bubbles in the fermented batter as shown in the pic below.


5. Grease the idli molds with little oil. add water to the steamer or pressure cooker and allow it to boil. Add the idli batter to the greased molds of the idli pan. Assemble the idli stand and place it in the steamer or pressure cooker. If using a cooker, remove the whistle and cover the cooker with the lid. Steam the idlis on medium heat for around 20 minutes.


6. Serve the hot idlis with Sambar and Coconut chutney and enjoy it with your loved ones!


Recipe Notes:
  • The ratio of barnyard millet to black gram is 2:1. I also soaked a few fenugreek seeds along with the black gram. 
  • The same batter can be used to make barnyard millet dosa.
  • Do not add water to the soaked barnyard millet while grinding. The idli batter before fermentation should not be too thick or too runny. It should be smooth and of dropping consistency.
  • The remaining idli batter can be stored in an air-tight container in the refrigerator for 2-3 days.
  • The time taken for fermentation of idli batter will vary from place to place depending upon the temperature of that place and season.
I hope a few of you would love to try out this recipe. If you do so, feel free to share your feedback with us in the form of likes and comments in the comment section below this post. All your suggestions are also more than welcome. If you like my work and feel it is worth following, do hit the follow button at the top right corner of this blog. Your appreciation means a lot to me. For more recipes and new updates follow us on social media.
Related Posts:


Monday 27 April 2020

Masala Khakhra


Masala Khakhra is a healthy and delicious snack from the Indian state of Gujarat. It is basically a non-fried, thin cracker made from spiced whole wheat flour. Very little oil is used in making this crisp savory flatbread, which can be served at breakfast with curd or pickle or as a tea time snack and enjoyed by people of all ages. This masala khakhra is vegan, diabetic-friendly, and good for those aiming weight loss. Masala khakhra can be easily made at home and stored for around 2 weeks at room temperature in an air-tight container, thus it also makes up for ideal travel food.


What is Khakhra?

Khakhra is a thin cracker common in the Gujarati and Rajasthani cuisines of western India. It is usually made from whole wheat flour, spices, and oil and served during breakfast. Khakhra can be made of different varieties depending upon the ingredients used. Gluten-free khakhra can be made using pearl millet (bajra) flour. Khakhra can be flavored with different herbs and spices like methi khakhra is flavored with fresh or dried fenugreek leaves, pudina khakhra has flavors of mint, jeera khakhra in which cumin seeds spice the khakhra, garlic khakhra in which minced garlic is used for flavoring the khakhra.

Salt, oil, and spices are added to whole wheat flour or pearl millet flour. Sometimes little chickpea flour (besan) is also added to the whole wheat flour and the dough is kneaded using water or milk. Small balls are made from this dough after resting for a few minutes. These dough balls are then rolled out as thin as possible using a rolling pin and then roasted on a heated skillet on low flame and pressed using a wooden press until it becomes crisp and golden brown from both sides.


What goes into my Masala Khahkra ?

These khakhras are made using whole wheat flour. I have not added chickpea flour to it, however, you may add it in little quantity along with whole wheat flour as a variation. As the name suggests, this cracker is flavored with masala or blend of spices. Here, I have used pounded cumin seeds (jeera), red chili powder and dried fenugreek leaves (Kasuri methi) to flavor the dough along with salt. You may use finely chopped fresh fenugreek leaves also. Turmeric powder gives an appealing yellow color to the Khakhra. Little oil is also added to the flour along with spices, herbs, and salt. I have used only water to knead the dough. You may use milk also if you wish.

The khakhra dough should be slightly tight than what we make for chapati. The dough is then allowed to rest for at least 20 minutes. Small dough balls are made out of it and rolled out individually as thin as possible and further roasted on low flame on a skillet. The rolled-out dough disc is pressed while roasting using a wooden press until it becomes crisp and golden brown from both sides. If you do not have a wooden press, you may use a folded kitchen towel to press the khakhras. Little oil is also added to the khakhra while roasting and then finally chaat masala is sprinkled on the roasted khakhra which makes it all the more flavorful and lip-smacking. The prepared khakhras are stacked after cooling down completely and stored in an airtight container at room temperature. The key to a crisp khakhra is to roll it out into a very thin disc and slow roast it while continuously pressing it with a wooden press or folded cloth.

Wooden Press used to press the Khakhra while roasting
                               
Related event:


My family loves Khakhra to the core. Whenever Kiran is on an office tour to Ahmedabad or Baroda, he makes sure he gets back a variety of Khakhra packets with him. Sadly we do not get khakhras here in Mohali, so I make them at home. So, for this week when #SnackMania was chosen as the theme for 244th week on Foodie Monday Blog Hop, I knew I was going to post this masala khakhra recipe for sure. Foodie Monday Blog Hop is a gourmet group on Facebook where a group of talented food bloggers share recipes each week depending on a predecided theme. Each blogger gets a turn to suggests 2 themes per week and the rest of us vote for any 1 of those. The theme with maximum votes is finalized. This week it was Renu's turn to suggest the theme and thus Snacks Mania was chosen. Under this category, we could share a number of snacks both sweet and savory. The only criteria was that the snack should have a good shelf life so that one could store it in the Kitchen cupboard for at least 2 weeks. Renu further suggested that the snack be healthy and if possibly non-deep fried. We could share baked sweet or savory dishes as well. I already have Makhana Chiwda, Chakli, Aata Namak Pare, Whole Wheat Jeera biscuits, Thekua, Cornflakes Chivda, Bhakharwadi, Baked Ragi Cracker, Baked Methi Mathri, Masala Nimki. The next on my to-do list is Renu's Chocolate Cornflakes, a two-ingredient chocolaty treat that kids can make by themselves and The herb-roasted Chickpeas .


Preparation Time: 30 minutes
Cooking Time: 30 minutes
Serves: 15 Khakhras

Ingredients: Measurements used 1 cup = 240ml
  • 2 cups whole wheat flour
  • 1 tablespoon dried fenugreek leaves / Kasuri Methi
  • 1-2 teaspoon red chili powder or as per taste
  • 1 teaspoon crushed cumin seeds
  • 1/4 teaspoon turmeric powder
  • 1/2 teaspoon salt
  • 2-3 tablespoon oil
  • 1-2 tablespoon chaat masala
Method:
  1. In a large mixing bowl, take whole wheat flour. Add dried fenugreek leaves, red chili powder, turmeric powder, cumin seeds, salt, and 2 teaspoons oil. Mix all the ingredients well. Now add little water at a time knead the flour to a semi-tight dough. Cover the dough with a kitchen towel and allow it to rest for 15-20 minutes.


2. Apply little oil to the rested dough and knead it once again and make 15 equal portions of it. Take one dough ball and roll it out using a rolling pin into a very thin disk. You may apply little oil or flour if the dough sticks while rolling. I did not add either. Make sure you cover the rest of the dough balls with a kitchen towel while working to prevent it from drying out.


3. Carefully lift the rolled out disc and transfer it to a heated skillet. Lower the flame and roast the disc. You will see small air pockets raising on it. Press it down using the wooden press as shown in the pic below. Flip it and keep pressing and roasting until you get a crisp khakhra that is golden brown in color from both sides. Drizzle little oil at the edges of each khakhra while roasting.


4. Remove the khakhra on a plate and allow it to cool down, Make all the khakhras similarly. Sprinkle chaat masala on both sides of each khakhra while it is still hot. Once all the khakhras cool down completely, stack them and store them in an airtight container and use it as per need.


5. Serve the delicious and lip-smacking Masala Khakhras at tea time or along with some pickle and curd at breakfast and enjoy with your loved ones!


Recipe Notes:
  • Gluten-free khakhra can be made using pearl millet (bajra) flour. 
  • Khakhra can be flavored with different herbs and spices like methi khakhra is flavored with fresh or dried fenugreek leaves, pudina khakhra has flavors of mint, jeera khakhra in which cumin seeds spice the khakhra, garlic khakhra in which minced garlic is used for flavoring the khakhra.
  • Masala Khakhra can be served at breakfast with curd or pickle or as a tea time snack.
  • Make sure you cover the rest of the dough balls with a kitchen towel while working to prevent it from drying out.
  • The rolled-out dough disc is pressed while roasting using a wooden press until it becomes crisp and golden brown from both sides. If you do not have a wooden press, you may use a folded kitchen towel to press the khakhras.
  • The key to a crisp khakhra is to roll it out into a very thin disc and slow roast it while continuously pressing it with a wooden press or folded cloth.

I hope a few of you would love to try out this recipe. If you do so, feel free to share your feedback with us in the form of likes and comments in the comment section below this post. All your suggestions are also more than welcome. If you like my work and feel it is worth following, do hit the follow button at the top right corner of this blog. Your appreciation means a lot to me. For more recipes and new updates follow us on social media.

For more snack recipes with good shelf life, check out the following from this blog


Monday 20 April 2020

Bombay Sandwich Recipe


Bombay Sandwich is a delicious snack and popular street food of Mumbai (earlier known as Bombay). All you require to make this vegetarian sandwich is a flavorful green herb chutney, loads of sliced vegetables and a blend of few spice powders (masala) apart from bread slices and butter. With a very easy recipe, even kids can make this sandwich on their own. You can add some grated cheese and grill the sandwich or have it as it is with some ketchup.


What is a Sandwich?

A sandwich is a food typically consisting of vegetables, sliced cheese or meat, placed on or between slices of bread. Sandwiches come in many different varieties like the open-faced sandwich where any kind of bread serves as the base to which filling is added at the top and does not have any covering over the filling, Plain sandwich with filling placed between two slices of bread, grilled sandwich where the prepared bread slices with stuffing are grilled, pinwheel sandwich wherein the fresh bread slices are flattened with a rolling pin, stuffed with filling that is spreadable and rolled up like a jelly roll, ribbon Sandwich- a multi-tiered sandwich, etc.

What goes into my Bombay Sandwich?

The first and obvious ingredient of this Bombay sandwich is bread slices. Use fresh white or brown bread for best results. You may wish to remove the brown crust at the sides using a knife or keep it as it is. Next, i have used fresh homemade unsalted butter to smear the bread slices. You may use store-bought salted butter instead. To make a vegan version, you may use skip using dairy butter or use a plant-based fat. The next important ingredient of the Bombay sandwich is the vibrant green herb chutney. This chutney is spread on buttered bread slices. You may make this chutney ahead of time and store it in the refrigerator. In fact, you will find this green chutney handy in most of the Indian pantries. I have used fresh coriander leaves, ginger, cumin seeds, green chilies, salt, and lemon juice to make this herb chutney. You may add fresh mint leaves also along with cilantro if you wish to.

Next, we need sliced salad veggies like cucumber, tomato, onion. Apart from this boiled potato and beetroot slices are also used in the Bombay sandwich which makes it filling and nutritious. You may add sliced bell peppers as well. I have not used it as my little one does not like the taste of raw bell pepper in his sandwich. Apart from these ingredients, we require Bombay Sandwich masala, a blend of flavorful spice powders that give a spicy, tangy kick to the sandwich. This spice powder is sprinkled over the layers of sliced veggies in the sandwich. I have simply mixed readymade chaat masala and freshly ground black pepper powder and used it instead. The last step is to assemble the sandwich. Buttered bread slices are smeared with green chutney and sliced vegetables are arranged on it in layers. Spice powder is sprinkled over the layered veggies. I have made a two-tiered sandwich here using 3 bread slices. Finally, the sandwich is closed with another layer of bread slices. To keep the sandwich positioned, you may insert toothpicks at 4 sides of the sandwich and then cut the sandwich into 4 equal parts. You may add grated cheese also to the sandwich and grill it if you wish to. I have kept it simple.

Related Event:

It was Priya's turn to suggest the theme for the 243rd week on our Facebook gourmet group, Foodie Monday Blog Hop. Summer vacations for kids have begun in most parts of the world and owing to the COVID 19 breakdown and lockdown, not only kids but most of the family members are at home. The best way to keep kids busy is to involve them in some or the other creative activities along with elders. I personally love involving my little one while baking muffins and cookies for him. believe, me it is so much fun. Yesterday, it was my mom's birthday and my little one baked an easy-peasy 3 ingredient, Chocolate Biscuit Cake for his granny. There are so many simple no-cook dishes as well like this Bombay sandwich which kids can make on their own under the guidance of elders. Taking this into consideration, Priya suggested that we share such recipes that kids can do easily on their own and so the theme "LittleChefs" was decided. You should check her, Indian style, Bread Pizza with green chutney and Cheeselings bhel recipes, which kids can enjoy making and eating with their friends.


Preparation Time: 15 minute
Cooking Time: nil
Serves: 2

Ingredients for the herb chutney:

  • 1 small bunch of fresh cilantro
  • 2 green chilies
  • 1/2 teaspoon cumin seeds
  • 1/2 inch ginger
  • 1 tablespoon lemon juice
  • 1/2 teaspoon salt
  • 2-3 tablespoon water
Ingredients for the Sandwich Masala:
  • 1 tablespoon chaat masala
  • 1 teaspoon freshly crushed black pepper
Ingredients for the Bombay Sandwich:
  • 6 bread slices
  • 2-3 tablespoon butter, I have used white unsalted butter
  • 1/2 cup herb chutney
  • 1-2 tablespoon sandwich masala
  • 1 small cucumber
  • 1 small tomato
  • 1 onion 
  • 1 potato, boiled
  • 1 beetroot, boiled
Method:
  1. To begin with, making the Bombay sandwich, first, we will prepare the herb chutney. For that take all the ingredients mentioned under the list of ingredients for herb chutney in a blender jar and pulse to get a smooth lump-free dip. Adjust the water quantity such that the chutney is spreadable but not very flowy in consistency. You may also add fresh mint leaves along with cilantro if you wish.


2. Just mix the chaat masala and freshly ground black pepper together and our sandwich masala is ready. Slice all the veggies and keep ready. You may use the veggies as per your liking. I have not added bell pepper here, as my little one does not like the taste of raw bell pepper.


3. Remove the brown edges of the bread slice using a knife if you wish. We are making a 2-tier sandwich here, so 1 sandwich will require 3 bread slices.


4. Now, spread butter over the 3 bread slices.


4. Next, evenly spread the herb chutney over the butter layer. Now arrange the veggies in layers over 2 bread slices and sprinkle the sandwich masala over each veggie layer. There is no specific order to follow here. I have placed 4 onion slices at the base of one bread slice and topped it with boiled beetroot and cucumber slices. On the next slice, i placed the boiled potato slices at first and topped it with tomato slices.


5. Now to assemble the sandwich, place the bread slice with onion, beetroot and cucumber slices at the base, carefully place the slice with boiled potato and tomato over it. Lastly, cover the sandwich with the chutney smeared bread slice.

6. Now carefully, cut the sandwich into 4 equal parts using a sharp knife. To make the job easier and to secure the sandwich layers while cutting and serving, insert 4 toothpicks at the 4 corners of the sandwich.


7. Serve the delicious Bombay sandwich with ketchup and enjoy it with your loved ones!


Recipe Notes:
  • Serve the Bombay sandwich immediately, as it becomes soggy if kept for a long time.
  • Keep the herb chutney consistency such that it is spreadable but not too flowy.
  • You may add mint leaves also along with cilantro to make the herb chutney. The herb chutney can be made ahead of time and refrigerated until use.
  • You may use any vegetables of your choice to make this Bombay sandwich.
  • To make a vegan version skip the use of butter or replace the dairy butter with plant-based fat.
  • You may use white or brown bread to make this sandwich.
  • Removing the brown crust at the edges of the bread slice is optional. You can keep it if you wish to.
  • You may add grated cheese on these Bombay sandwich and grill the sandwich or serve it plain the way i have served here.

I hope a few of you would love to try out this recipe. If you do so, feel free to share your feedback with us in the form of likes and comments in the comment section below this post. All your suggestions are also more than welcome. If you like my work and feel it is worth following, do hit the follow button at the top right corner of this blog. Your appreciation means a lot to me. For more recipes and new updates follow us on social media.
For more recipes, that your little chefs can try out, check out the following from this blog


                           \


poonambachhav.blogspot.com