/body> >

Thursday 31 March 2022

Lemonade Powder / Nimbu Sharbet Premix Recipe


Nothing is more refreshing and satiating than a cool glass of lemonade on a Summer afternoon. How about making Nimbu Pani  / Lemonade Premix or powder ? You can treat yourself with a glass of lemonade anywhere, anytime using this powder, almost instantly. You can carry this Lemonade powder to school, office, while travelling and make a lemonade instantly , as all you have to do is, open the jar of the lemonade premix, add a spoon or two of it to your glass of water or sparkling water / soda and give a quick stir, as simple as that. What's more ? You can store this lemonade powder at room temperature in an air tight container for about 6 months. 


Lemonade is a power house of Vitamin C, helps in boosting our immunity, and is a refreshing instant energy source. It is good for your skin and hair, it keeps you hydrated and energetic. Lemonade is made by adding lemon juice to drinking water and then adding sweetener of your choice to it. Salt and spice powders like roasted cumin powder may be added for flavoring if desired. 

What goes into Lemonade Powder ? 

To make a Lemonade we require two basic ingredients, that is lemons and sugar, same is the case with this powder. We require just 2 key ingredients, lemon juice and sugar. Freshly squeezed out lemon juce is spread on a plate and a layer of sugar is spread over it. This is allowed to dry out indoors under fan , making sure the layer of lemon juice and sugar is scrapped every 4 hours and spread again for 3 days or until you obtain a dry lemon sugar, free of any moisture. This lemon sugar is powdered using a grinder jar to obtain the ready to use lemonade premix. Rock salt may be added while grinding the sugar. 

Ratio of Sugar to lemon juice is 4:1

Shelf Life : 6 months at room temperature when kept in an air-tight container

Short Video For Nimbu Sharbat Premix / Lemonade Powder


Preparation Time : 3 days

Cooking Time:  Nil

Serves: 2 cups of lemonade powder

Ingredients: 

  • 1 dozen medium sized Lemon / 100 ml lemon juice
  • 400 grams sugar
  • 1 teaspoon rock salt
Method:
  1. Wash the lemons, pat dry , cut into halves and squeeze out the juice using a lemon juice extractor.
  2. Measure the juice and divide it into 2 equal parts. 
  3. Spread the lemon juice on to 2 plates.
  4. Add 4 times the amount of sugar to that of lemon juice and spread it as a uniform layer over the lemon juice. Press it lightly as we do not want the sugar to dissolve in the lemon juice as that will take more time to cool and we may not obtain crystals.
  5. Keep the plates to dry under the fan indoors and not in sunlight, as the sugar will melt if kept outside. 
  6. Make sure to scrap the sugar lemon juice layer at an interval of 4 hours for 3 days so that it dries our evenly.
  7. at the end of 3rd day, you will get a dry lemon sugar.
  8. Transfer it to a dry grinder jar with 1 teaspoon of rock salt if using and pulse to get a powder.
  9. Transfer the lemonade powder to a clean dry glass jar with a tight fitting lid.
  10. Use a dry spoon to spoon out the lemonade premix. 
  11. Store the lemonade premix jar at room temperature and not in the refrigerator. If used with care, it stays good for about 6 months.
  12. To make lemonade using this premix, just add  1 or 2 tablespoon of this lemonade premix to a glass of water or soda and give a good stir. You may add ice cubes and mint leaves if desired.


Would love to hear from you !

I hope you would love trying out this handy Lemonade powder. If you do so, feel free to share your feedback with us in the form of likes and comments in the section below this post.

All your suggestions are more than welcome. If you like my work, and feel that it is worth following, do hit the follow button on the top right corner of this blog. Your appreciation means a lot to me. It gives me the inspiration and motivation to keep doing my work and give my best each time.

If you like my work and want to be updated with new recipes, do follow us on various social media platforms. My social media handles for your kind reference are as follows. 


You Tube Channel English : 

https://www.youtube.com/channel/UCasKW9Cq5khnTS3JnJ43m2A 

You Tube Channel Marathi :

 https://www.youtube.com/channel/UC5lWdtDq45pDz04dJeezw7A

You Tube Channel Hindi : 

https://www.youtube.com/channel/UC3BoiHHEbhS8gIfeRzPfb7w

Facebook Handle: https://www.facebook.com/poonambachhavblogspot

Instagram Handle: https://www.instagram.com/poonambachhav/

Pinterest Handle : https://in.pinterest.com/poonambachhav/

Twitter Handle: https://twitter.com/poonampagar_B


See you soon with yet another healthy and delicious creation from my Kitchen. Until then Stay safe and eat right !


Happy Cooking !

Happy Eating !


Regards

Poonam Bachhav 


Related Posts: 


Tuesday 29 March 2022

5 types of Maharashtrian Koshimbir / Raita Recipes


Summer's are in and I am here with 5 refreshing Koshambir varieties. Koshimbir is Marathi is basically a salad which can be yogurt based (Raita) or non-yogurt based. Today, I am sharing 5 yogurt based recipes, basically Raita recipes that can be served as a side dish to any veg or non-veg meals. All the 5 raita recipes are easy to make , healthy and delicious and make a wonderful pair with spicy rice dishes or paratha. You can simply dig into a cooling bowl of any of this raitas on its own as a salad. The 5 raita recipes that we are going to learn are, Palakachi Koshimbir (Spinach Raita), Gajarachi Koshimbir (Carrot Raita), beetroot chi Koshimbir (Beetroot pachadi ), Dudhi chi Koshimbir (Lauki / Bottle gourd Raita) and Kakdi, Kanda , Tomato chi Koshimbir (Cucumber, onion, tomato raita).

What is a Koshimbir ?

Raita is a curd based dish and forms an integral part of any Indian thali (platter) and this holds true with a typical Maharashtrian platter as well. Our everyday meals are incomplete without a bowl of koshimbir as a side dish. In Maharashtrian Cuisine, a koshimbir is a salad dish that can be made either with curd/ yogurt or without it. Variety of vegetables or fruits are added to the seasoned curd to make a koshimbir and it may be tempered or kept plain. Usually little sugar is added to almost all the koshimbir dishes with curd. Vegetables may be either added raw like in the Kakdichi Koshimbir or cooked like the Doodhichi Koshambir. I like to have my koshimbir with waran bhat (dal chawal). 


Video Recipe for 5 types of Maharashtrian Koshimbir                        


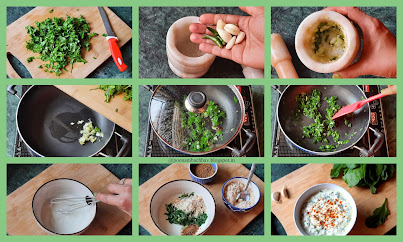
Palakachi Koshimbir (Spinach Raita) : A simple yet flavorful raita with healthy goodness of spinach and yogurt. It has a distict flavor coming from garlic, a nutty flavor and bite from the added roasted peanut powder. You can serve palak raita with any rice dish of your choice. It can also be served as a side dish with paratha or poori.


Ingredients:
  •  1 small bunch of fresh Spinach leaves
  • 3-4 cloves of garlic
  • 1 green chili
  • 1 1/2 cup homemade fresh curd
  • 1/2 teaspoon oil
  • Rock salt to taste
  • 1/2 teaspoon roasted cumin powder
  • 1 tablespoon roasted peanut powder
Method:
  1. Thoroughly wash the spinach leaves and tender stems and chop finely.
  2. Crush garlic and green chilies in a mortar and pestle.
  3. Heat 1/2 teaspoon oil in a pan on medium flame
  4. Add the crushed garlic and green chili to it and saute for 30 seconds.
  5. Next tip in shredded spinach leaves with a pinch of rock salt and saute until they begin to wilt, say about a minute.
  6. Put off the flame and allow the cooked spinach to cool down.
  7. In a mixing bowl, add curd and whisk it until it becomes smooth and lump free.
  8. Add the wilted spinach to it followed by roasted cumin powder, a bit of salt and coarsely ground peanut powder. 
  9. Give it a good mix.
  10. Our flavorful spinach raita or Palakachi Koshimbir is ready to serve.
  11. You may sprinkle roasted cumin powder and red chili powder over the raita just before serving.    

Doodhi Chi Koshimbir / Lauki Raita : Doodhichi Koshimbir is a healthy and refreshing side dish from the Maharashtrian Cuisine made with steamed bottle gourd and yogurt. Bottle gourd is called doodhi and koshimbir is a salad with our without yogurt in Marathi, so basically doodhichi koshimbir is a bottle gourd in yogurt dish also called as Lauki Raita in Hindi. This raita is mildly sweet and sour in taste and gets a lovely taste from the flavorful ghee tempering of spices and herbs. This is a gluten-free and onion-garlic free recipe which serves as a delicious side dish to rice dishes like Biryani and Pulao and also goes well with paratha or Sabudana Khichadi. The recipe is very simple and requires a few basic ingredients. Doodhichi Koshimbir is one of the flavorful ways of including the healthy goodness of bottle gourd into your daily diet and best part is that it is great for weight watchers as well. Click here for the detailed recipe.


Gajarachi Koshambir / Carrot Raita :  A very simple yet flavorful carrot raita made using red juicy delhi carrots with seasoned yogurt. You can have this raita with or without tempering. 


Ingredients:
  • 1 large carrot, washed, peeled and grated
  • 1 1/2 cup thick yogurt / curd
  • 2 green chilies, finely chopped
  • 1 teaspoon sugar
  • Rock salt to taste
  • 2 tablespoon coarsely ground roasted peanut powder
  • 1 teaspoon of oil for tempering (optional)
  • 1/4 teaspoon mustard seeds
  • 1 sprig curry leaves
Method:
  1. In a large mixing bowl add curd, season it with salt and sugar and whisk it until smooth and creamy using balloon whisker.
  2. Add grated carrot, green chilies, roasted cumin powder and roasted peanut powder to it and give a good mix.
  3. Our Carrot raita is ready to serve. I have tempered the raita .
  4. Heat 1 teaspoon oil . Add mustard seeds to it. Once the seeds splutter and curry leaves and put off the flame. 
  5. Pour this tempering over the carrot raita and give it a good mix.

 Kakdichi Koshambir / Cucumber Raita : Just the addition of finely chopped cucumber, onion, tomatoes , green chilies and coriander to thick home made curd seasoned with sugar and salt gives a refreshing summer treat. Click here for the detailed recipe
                                  

Beet chi Koshambir / Beetroot Raita : With a very appealing color , this beetroot raita is healthy and flavorful with distinct flavor coming from fresh scrapped coconut. Click here, for the detailed recipe.
                                          

Would love to hear from you !

I hope you would love trying out this healthy and delicious Koshambir recipes. If you do so, feel free to share your feedback with us in the form of likes and comments in the section below this post.

All your suggestions are more than welcome. If you like my work, and feel that it is worth following, do hit the follow button on the top right corner of this blog. Your appreciation means a lot to me. It gives me the inspiration and motivation to keep doing my work and give my best each time.

If you like my work and want to be updated with new recipes, do follow us on various social media platforms. My social media handles for your kind reference are as follows. 


You Tube Channel English : 

https://www.youtube.com/channel/UCasKW9Cq5khnTS3JnJ43m2A 

You Tube Channel Marathi : 

https://www.youtube.com/channel/UC5lWdtDq45pDz04dJeezw7A

You Tube Channel Hindi : 

https://www.youtube.com/channel/UC3BoiHHEbhS8gIfeRzPfb7w

Facebook Handle: https://www.facebook.com/poonambachhavblogspot

Instagram Handle: https://www.instagram.com/poonambachhav/

Pinterest Handle : https://in.pinterest.com/poonambachhav/

Twitter Handle: https://twitter.com/poonampagar_B


See you soon with yet another healthy and delicious creation from my Kitchen. Until then Stay safe and eat right !


Happy Cooking !

Happy Eating !


Regards

Poonam Bachhav 


Related Post:


Tuesday 15 March 2022

Crispy Rice Flour Snacks Recipe / Rice Namakpare


Rice Namakpare is a crispy crunchy deep-fried snacks made from rice flour. It is basically rice fries that can be served as finger food for toddlers or as a flavorful tea-time snacks. The recipe is vegan and gluten-free. To make it a guilt free affair, you can air-fry or bake the rice namakpare. You can pair Rice Namakpare with any dip of your choice though it tastes good by itself. 


What goes into this crispy rice Namakpare ? The ingredients:

The star ingredient of this dish is rice flour. You can use any variety of rice flour for this recipe. Rice flour makes this snacks gluten-free and super crispy. Apart from rice flour, some basic spices and herbs go into this dish and oil for deep frying. You might want to check out my Instant Rice Chakli recipe which is another crispy crunchy tea time snacks or Ammini Kozhukattai, the steamed rice flour dumplings, from my blogger friend Priya Vijay Krishna's space .

Dietary Notes:

  • Vegan
  • Vegetarian 
  • Gluten-free
  • Tea-time snacks
  • Kid friendly

Preparation Time:15 minutes

Cooking Time: 15 minutes

Serves: 2 dozen 

Ingredients:

  • 1 cup rice flour
  • 1 cup water
  • 1/4 teaspoon turmeric powder
  • 1/4 teaspoon cumin seeds
  • 1/2 teaspoon Onion seeds / Kalonji
  • 1 teaspoon red chili flakes
  • A small bunch of fresh coriander leaves
  • 1 tablespoon oil + for deep frying
  • Salt to taste
Method:
  1. Heat 1 cup water in a sauce pan to a rolling boil.
  2. Add turmeric powder, cumin seeds, Onion seeds, 2 teaspoon oil and salt to taste.
  3. Add rice flour to it and give a quick stir. 
  4. Put off the flame and cover the saucepan for around 5 minutes. 
  5. Once the dough has cooled down enough to handle, add chili flakes and finely chopped coriander leaves.
  6. Grease your palms and knead the cooked rice dough for 5 minutes, such that there are no lumps and the dough becomes smooth and pliable.
  7. Divide the dough into 2-3 equal size parts.
  8. Take one portion, cover the rest dough portions with a damp kitchen town to prevent drying out .
  9. Roll it out into a 1/4 inch thick sheet. 
  10. Cut the dough into desired shape and deep fry until crispy and golden brown from all sides.
  11. Remove the fries on to a tissue paper lined plate and serve hot with ketchup or any dip of your choice.


Recipe Notes: 
  • You can use any variety of rice flour to make this snacks.
  • Knead the rice dough while it is still hot to make it smooth and pliable.
  • Deep fry the rice namakpare on medium flame. 
  • Store the rice fries in an airtight container at room temperature.
  • You can add minced garlic, or crushed dried fenugreek leaves to flavor the rice fries as variation.

Would love to hear from you !

I hope you would love trying out this healthy and delicious Rice Namakpare. If you do so, feel free to share your feedback with us in the form of likes and comments in the section below this post.

All your suggestions are more than welcome. If you like my work, and feel that it is worth following, do hit the follow button on the top right corner of this blog. Your appreciation means a lot to me. It gives me the inspiration and motivation to keep doing my work and give my best each time.

If you like my work and want to be updated with new recipes, do follow us on various social media platforms. My social media handles for your kind reference are as follows. 


You Tube Channel English :

 https://www.youtube.com/channel/UCasKW9Cq5khnTS3JnJ43m2A 

You Tube Channel Marathi :

 https://www.youtube.com/channel/UC5lWdtDq45pDz04dJeezw7A

You Tube Channel Hindi : 

https://www.youtube.com/channel/UC3BoiHHEbhS8gIfeRzPfb7w

Facebook Handle: https://www.facebook.com/poonambachhavblogspot

Instagram Handle: https://www.instagram.com/poonambachhav/

Pinterest Handle : https://in.pinterest.com/poonambachhav/

Twitter Handle: https://twitter.com/poonampagar_B


See you soon with yet another healthy and delicious creation from my Kitchen. Until then Stay safe and eat right !


Happy Cooking !

Happy Eating !


Regards

Poonam Bachhav 


Related Posts:

  • Instant Rice Chakli                                                       


Thursday 3 March 2022

Restaurant Style Mushroom Do Pyaza Recipe / Khumb Do Pyaza


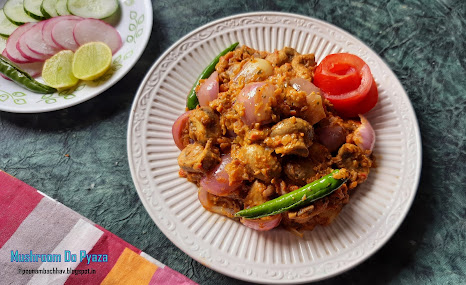
Mushroom Do Pyaza is a popular North Indian Vegetarian dish with white Button Mushrooms and Onions as key ingredients. It is a vegetarian semi-dry dish cooked with lots of Onions (double the quantity of Mushrooms) and is a wonderful variant to the other Do Pyaza dishes like Bhindi Do Pyaza and Paneer Do Pyaza. The earthy flavors and meaty texture of mushrooms complement very well with the mildly sweet taste of caramelized onions in this dish. Mushroom Do Pyaza makes a delicious side dish to any North Indian meal and pairs well with flatbreads like naan, chapati, phulka or paratha. Goes well in the Lunch Box as well.


A more about Do Pyaza or Dopiaza dish: 

Do Pyaza or Dopiaza is a onion based dish. In this, the quantity of onions used is usually double or more than the star ingredient. As mentioned above, the word Do pyaza translates to 2 onions and the dish gets the name with the fact that onions are used twice( at 2 stages) in cooking the dish. Once at the beginning when finely chopped onions are stir-fried and cooked with the main ingredient of the dish and spices and the second time at the end of the preparation where shallow fried cubed onions are used as garnish. 

Do Pyaza can be cooked both as a vegetarian or non-vegetarian dish. In the non-veg category, the dish usually contains a meat, usually chicken, beef, mutton, lamb or shrimp. Mushrooms, Paneer, Okra are preferred key ingredients in the vegetarian version of Do pyaza. 

According to the legend the dish was created when a courtier of Mughal emperor Akbar Mullah Do Piaza accidentally added a large quantity of onions to a dish. The dish evolved further in Hyderabad, India, Pakistan, and many other countries around the world and became a staple of Mughal Cuisine Source


Have you every tried recreating restaurant style dishes at home ? We love to dine out occasionally and enjoy the food that is served at restaurants. I enjoying experimenting the dishes that I have tasted in some restaurant or at a dhaba or at weddings and loved the flavors of it. I tasted Mushroom  do Pyaza 6 years back for the first time at a restaurant in Gurgaon, and instantly fell in love with the dish. Everything we visited that restaurant,  this dish was sure to be on our menu..the following week I would try recreating the dish at home and after several attempts of trial and errors , I can proudly say that , my version tastes very much like the one that was served there at the restaurant.  

Recreating restaurant  style dishes at home was also the theme on our Facebook  gourmet group, Shhhhhh Cooking Secretly Challenge for the month of February.  The theme was suggested  by Aruna. If you are a fan of Do Pyaza dishes like us, you would love to try out her Paneer Do Pyaza recipe as well. Participating members exchange a pair of secret ingredients with their assigned partners for the theme. My partner was Preethi di and she gave me Bay leaf and Cashews as my secret ingredients and i made this delightful Restaurant style Mushroom Do Pyaza. In return, i  gave her Onion and chaat masala and she made lipsmacking Boondi masala using it.


Short Video Recipe for Restaurant style Mushroom Do Pyaza


Dietary Notes: This Mushroom Do Pyaza is
  • Vegetarian Side Dish
  • Vegan
  • Gluten-free
  • Restaurant-style
  • Semi-dry creamy dish
  • Goes well in Lunch Box
  • Kid Friendly
  • Pairs well with Indian flat-bread
  • Easy to make
  • Super delicious

Preparation Time: 15 minutes
Cooking Time: 20 minutes
Serves: 4

Ingredients:
  • 250 grams white Button Mushrooms
  • 7-8 medium Onions
  • 3 medium Onions
  • 2-3 green chilies, slit
  • 1 inch ginger
  • 4-5 garlic cloves
  • 3-4 tablespoon Oil
  • 10-12 Cashewnuts
  • 2 teaspoon melon seeds
    1 teaspoon Kashmiri red chili powder
  • 1 teaspoon coriander powder
  • 1/2 teaspoon roasted cumin powder
  • 1 teaspoon Kasuri methi
  • 1/4 teaspoon turmeric powder
  • 1/4 teaspoon garam masala
  • Salt to taste
Method:
  1. Thoroughly wash the mushrooms under running water. Pat them dry using a clean and dry kitchen towel. Chop each mushroom into 2 pieces. We will be keeping big chunks as mushrooms shrink on cooking.
  2. Peel, wash and chop 3 onions into cubes and separate the petals. Peel, wash and finely chop the remaining 4 onions.
  3. Puree the washed and roughly chopped tomatoes in a blender without adding any water.
  4. Coarsely grind the ginger and garlic. Slit the green chilies.
  5. Soak cashews and melon seeds in hot water for 10 minutes, grind to a smooth paste and keep ready.
  6. Heat a pan on medium flame. Add 1 tablespoon of oil to it. Add cubed onions (petals separated) to it and fry the onions for 1-2 minutes on medium to high flame. Remove the caramelized onions on to a plate, add slit green chilies to the same pan, fry the chilies and keep aside. 
  7. Next add the mushrooms to the pan and stir fry for 2-3 minutes. Remove and keep aside.
  8. To the same pan add remaining 2 tablespoon oil  and add whole spices, cumin seeds, bay leaf, cinnamon stick, cardamom and cloves. Allow the spices to sizzle in the oil for few seconds.
  9. Next, add ginger-garlic paste and saute for few seconds. Add finely chopped onions and stir fry until they turn translucent. 
  10. Add tomato puree to it and allow the gravy base to cover cook for 2-3 minutes or until you see oil separating.
  11. Lower the flame and add dry spice powders, turmeric powder, red chili powder, cumin powder, coriander powder. Give it a good mix. Stir-fry the spices for few seconds on medium flame.
  12. Add the cashew melon paste and little water to the gravy to adjust the desired consistency. Give a good stir and cook for 1-2 minutes.
  13. Add shallow fried mushrooms to it. Saute the mushrooms in the gravy base for 1-2 minutes or until they are cooked.
  14. Lastly add caramelized onions, crushed kasuri methi and garam masala and cook the curry for last 1 minute and put off the flame.
  15. Serve the healthy and delicious restaurant style Mushroom Do Pyaza with any flatbread of your choice like naan, chapati or paratha and enjoy a flavorful treat with your loved ones!


Would love to hear from you !

I hope you would love trying out this healthy and delicious restaurant style Mushroom Do Pyaza. If you do so, feel free to share your feedback with us in the form of likes and comments in the section below this post.

All your suggestions are more than welcome. If you like my work, and feel that it is worth following, do hit the follow button on the top right corner of this blog. Your appreciation means a lot to me. It gives me the inspiration and motivation to keep doing my work and give my best each time.

If you like my work and want to be updated with new recipes, do follow us on various social media platforms. My social media handles for your kind reference are as follows. 


You Tube Channel English : 

https://www.youtube.com/channel/UCasKW9Cq5khnTS3JnJ43m2A 

You Tube Channel Marathi :

 https://www.youtube.com/channel/UC5lWdtDq45pDz04dJeezw7A

You Tube Channel Hindi : 

https://www.youtube.com/channel/UC3BoiHHEbhS8gIfeRzPfb7w

Facebook Handle: https://www.facebook.com/poonambachhavblogspot

Instagram Handle: https://www.instagram.com/poonambachhav/

Pinterest Handle : https://in.pinterest.com/poonambachhav/

Twitter Handle: https://twitter.com/poonampagar_B


See you soon with yet another healthy and delicious creation from my Kitchen. Until then Stay safe and eat right !


Happy Cooking !

Happy Eating !


Regards

Poonam Bachhav 


Related Posts:


poonambachhav.blogspot.com