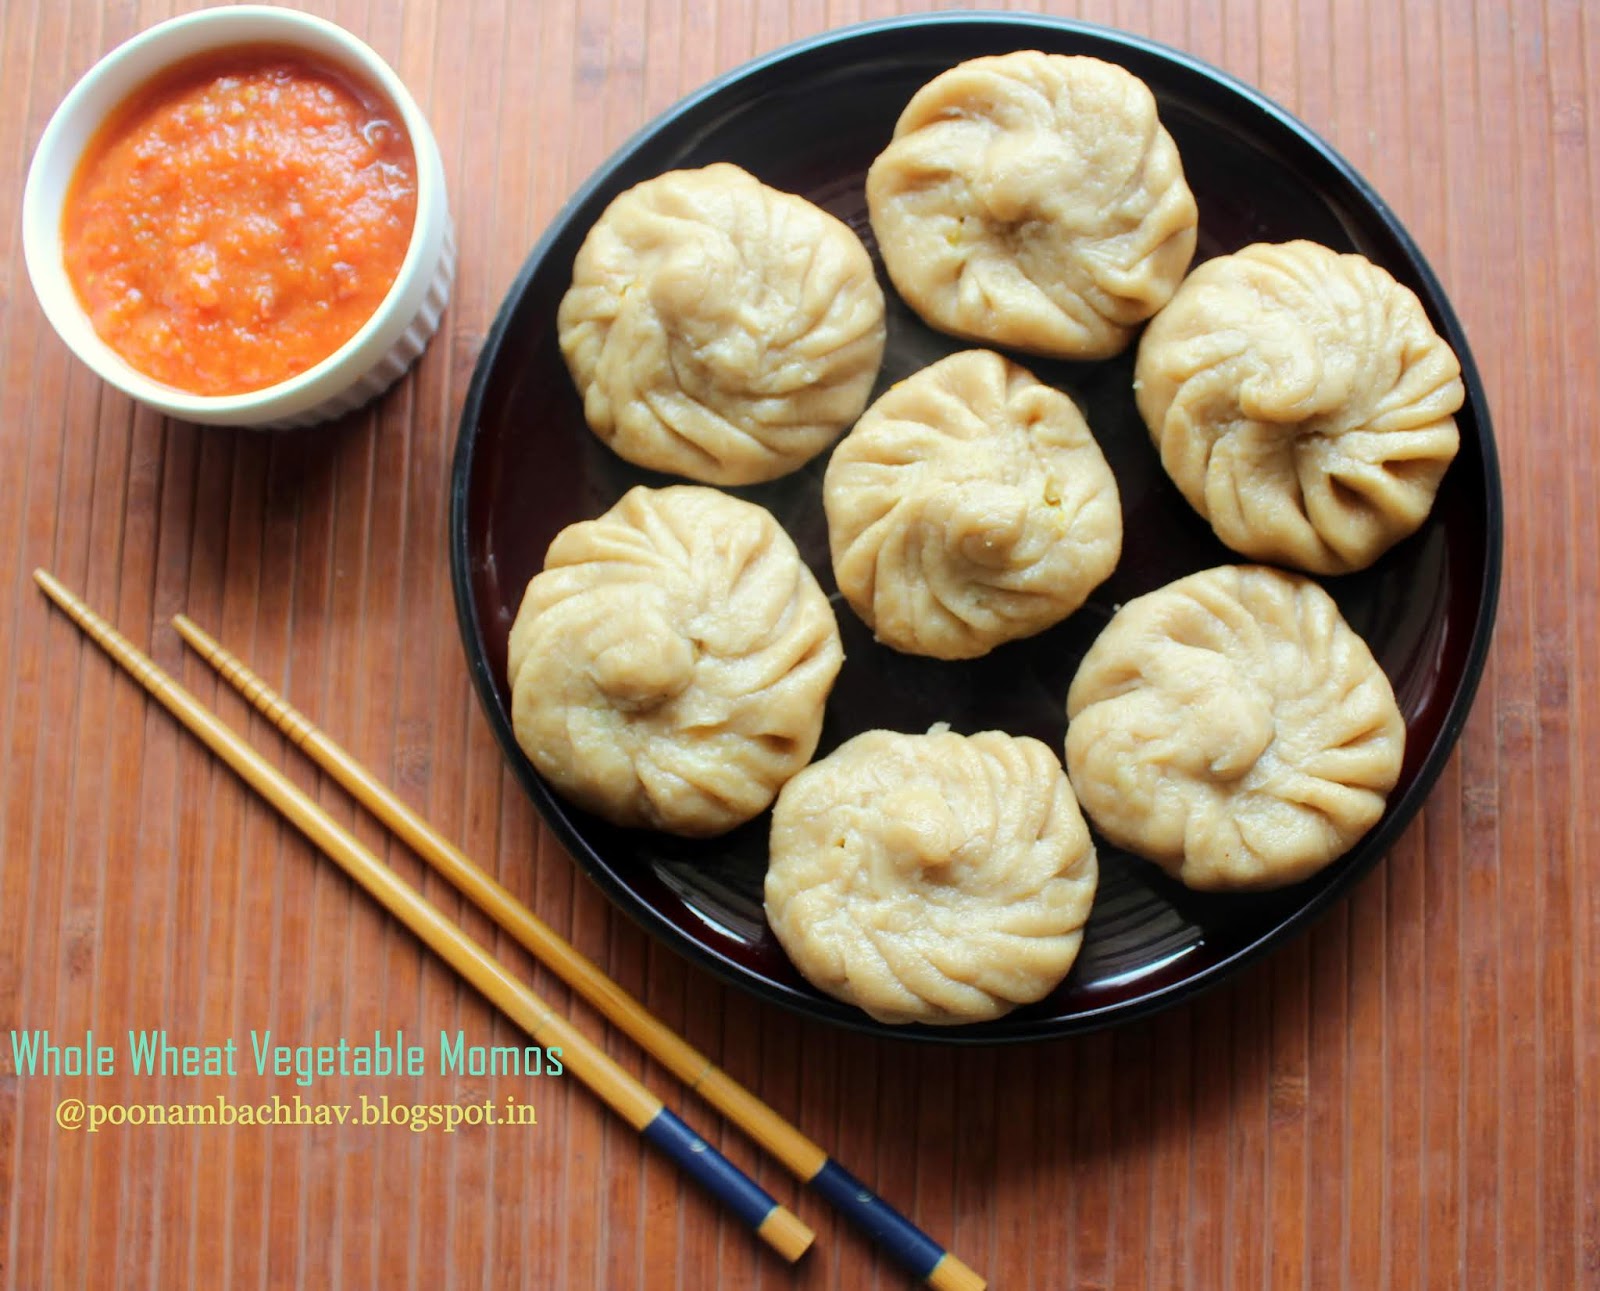
Momo is a type of South Asian dumpling popular across the Indian subcontinent. It is basically a steamed dumpling with vegetable or minced meat. Here, I am sharing a very healthy vegetable steamed dumpling recipe which is oil-free and replaces refined flour with whole wheat flour. It is one of the street foods and a popular delicacy in North Indian states of Sikkim, Arunachal Pradesh, and Assam. Steamed vegetable momos served piping hot with a fiery hot dip, Momos Chutney is a feast to the taste buds for sure and the best part is that you can make this dish easily at home and enjoy it guilt-free.
Covering of Momos: The covering of the momos is made using whole wheat flour, salt to taste and water. A soft dough is made and allowed to rest for a few minutes. Shaping the dough balls into beautifully pleated momos does require some practice and a lot of patience but it is not that difficult either.
Filling of Momos: The filling uses vegetables like carrot, cabbage, and onions. I have not stir-fried the filling so this recipe is oil-free. In some variations, the vegetables are sauteed in oil before stuffing it into the momos. Here the vegetables are kept raw which get steamed inside the momos. The veggies are spiced up with ginger garlic and green chili paste and freshly ground black pepper. To prevent the stuffing from getting watery, the shredded cabbage is treated with some salt so that it releases its juices. The water from this cabbage is squeezed out before adding it to other vegetables of the filling. You may add finely chopped capsicum, soy chunks or shredded paneer as well along with the veggies used here for variation and to make the momos more filling.

The pleating of Momos: Individual dough balls are rolled out using a rolling pin. You may cut the circles of uniform size using some lid or bowl having sharp edges. The filling is placed in the center of the rolled out dough disc and then small pleats are made around the edges using the index and middle fingers and thumb which are finally sealed in the center after twisting the momos a bit. One more point to keep in mind while you make the momos is to keep the dough and the pleated momos covered in a damp cotton cloth while you shape and fill the other momos to prevent them from getting dried up.
Steaming Of Momos: All the ready momos are then finally steamed in a steamer. I have used a 3 tier stainless steel steamer to steam my momos. If you do not have a steamer, you may keep the momos on a greased colander and keep that colander in a pressure cooker with a lid without the whistle and gasket or over a saucepan filled with water and cover the colander with a lid. I have steamed the momos for 15 minutes and the momos very perfectly done. If you steam for more than 20 minutes, chances are that momos may turn hard, so do not overcook them.
Dip to served with Momos: Momos are usually served with a fiery hot dip. I have served it with a homemade Momos Chutney made from tomatoes, garlic and red chilies. You may serve it with chili sauce or Schezwan Sauce if you wish.

I have made this whole wheat vegetable steamed momos as my contribution towards the food from the Northeastern Indian state of Sikkim. It is month-end again and the time for my regional Indian post for our Facebook Group, Shhhhh cooking Secretly Challenge, started by Priya of Priya's Versatile Recipes and taken further till date by Mayuri di who blogs at Mayuris Jikoni. In this group, each month we select an Indian state depending upon the alphabetical order and partners are assigned for the challenge. The chosen partners then exchange a set of secret ingredients among themselves and cook a dish with those ingredients from the regional cuisine of that month. The other group members who are not aware of the secret ingredients, then take turns to guess the ingredients just by looking at the pic of the dish. Doesn't this all sound interesting! If you are interested in joining this exciting group, leave a message in the comment section below.

So this month, we are on our virtual trip to the Indian state of Sikkim. Sikkim is a beautiful state in Northeast India bordered by Bhutan, Tibet, and Nepal. Nestling in the Himalayan mountains, the state of Sikkim is characterized by mountainous terrain. It is the least populated and the second smallest among the Indian states. Sikkim is notable for its biodiversity, including alpine and subtropical climates, as well as being a host to Kangchenjunga, the highest peak in India and the third-highest on Earth. Sikkim's capital and largest city is Gangtok.
Do you know that Sikkim accounts for the largest share of cardamom production in India, and is the world's second-largest producer of the spice after Guatemala. Sikkim achieved its ambition to convert its agriculture to fully organic over the interval 2003 to 2016, the first state in India to achieve this distinction. It is also among India's most environmentally conscious states, having banned plastic water bottles("in any government functions and meetings") and polystyrene products (throughout the state).
Sikkimese are traditionally rice eaters. Gundruk and Sinki are the two of the few well known vegetarian dishes of Sikkim. They are soups which are generally prepared during winters when vegetables are found in abundance. Some of the other popular dishes of Sikkim are dal bhat, thukpa, momo and dhindo.
My partner for this month theme was Priya Mahesh. Priya, an engineer by profession quit her corporate job to follow her passion which revolves around food and travel. Priya blogs @ 200deg.com, a food and travel blog where she shares her travel stories and culinary skills with us. This is the second time we both have got the chance to work together. Previously we were paired for the Mizoram Cuisine where i had prepared a flavorful Panch Phoran Tarkari. Priya thoughtfully gave me black pepper and ginger as my two secret ingredients for this month's theme which matched perfectly with the vegetable filling of my momos. In return, i gave her vegetable broth and garlic as her ingredients to be a bit tricky and she beautifully came up with the comforting Vegetarian Thupka, a vegetable noodle soup using homemade vegetable broth. Meanwhile, do check out her space for some interesting travel stories and delicious food recipes from around the globe.

Preparation Time: 30 minutes
Cooking Time: 15 minutes
Serves: 8-10 momos
Ingredients for the Momo covering/wrap:
- 2 cups whole wheat flour
- 1/2 teaspoon salt
Ingredients for the Vegetable filling:
- 1 cup cabbage, shredded
- 1 carrot, grated
- 1onion finely chopped
- 1/2 inch ginger
- 3-4 cloves of garlic
- 2-3 green chilies
- 1 teaspoon crushed black pepper
- Salt to taste
Method:
- We will first begin with making the covering for momos. For that, in a bowl take whole wheat flour. Add salt to it. Mix well and adding little water at a time, knead the flour to a soft dough. Cover and keep the dough aside until use.


2. While our momo dough is resting, we will make the vegetable filling for it. For that take the washed and drained grated or shredded cabbage in one plate and sprinkle a little salt over it. Keep it aside for 5-10 minutes.

3. The cabbage will release its juices. Squeeze out all the water from the cabbage and transfer it to another plate with the grated carrot and onion. This step ensures that the vegetable filling does not get watery and make it difficult to pleat the momos. Now make a coarse paste of the ginger garlic and green chili using a mortar and pestle. Add it to the vegetables along with black pepper powder and salt to taste. Mix all the ingredients well and taste it. Add more salt or pepper powder as per your liking. Our filling for momos is ready.


4. Now, knead the dough again and pinch out a portion from the dough and roll it using a rolling pin. Cut it into a large round disk using a lid or a bowl with sharp edges. This step is optional but it ensures all your momos are of uniform size.

5. Take one disc in your palms and place 1-2 teaspoon of vegetable stuffing over it in the center. Now using your thumb and index and middle fingers try making small pleats from one edge of the disc to the other. Press the filling and lightly twist the gathered pleats and seal the momo in the center. Refer the pics below for proper understanding and technique of pleating the momos.


6. Make momos similarly with all the dough and filling. Keep the dough and the prepared momos covered in a moist muslin cloth to prevent it from drying out. Lastly, prepare the steamer by placing water in the lower compartment and heating it over medium flame. Grease the other perforated pans of the steamer or place a muslin cloth over them. Carefully place the momos in the prepared steamer and steam for 15-20 minutes.


7. Put off the flame after 15-20 minutes and carefully transfer the steamed momos on to a serving plate with the help of tongs and serve piping hot with a spicy dip of your choice and enjoy the delicious guilt-free treat with your loved ones!

Recipe Notes:
- I have made the momos using whole wheat flour. You may use 1:1 ratio of APF and whole wheat flour if you wish.
- Do not steam the momos over 20 minutes as they turn hard on overcooking.
- Keep the momo dough and the prepared momos covered with moist muslin cloth while working with the dough to prevent it from drying out.
- As this is an oil-free recipe, i have kept the vegetable filling raw, which get cooked while we steam the momos. If you wish, you may saute the vegetables in little oil before stuffing them in the momos.
- I have used cabbage, carrot, and onions as the momo filling, you may use capsicum or shredded paneer (cottage cheese) or soya granules instead for variation. Non-vegetarians may use minced meat as the stuffing.
- The momos taste best when served piping hot as they turn chewy on cooling down.
If you ever try this recipe, do share your feedback with us in the comment section below. Follow us on #Facebook, #Instagram, #Twitter, #Pinterest and #Google+ for more recipes and new updates.
For more recipes from the North-East Indian states from this blog, do check out the following