/body> >

Monday, 28 February 2022

Crispy Chili Garlic Lotus Stem Recipe


Crispy chili garlic lotus stem is a lip-smacking Indo-Chinese starter / appetizer dish. Thinly sliced lotus stem are deep fried until crisp and further tossed with stir-fried minced garlic, chilies, red bell peppers and sauces . You can Air fry or bake the lotus stem roundels to make it guilt-free.


 Kamal Kakdi also called as lotus stem is an edible rhizome of lotus plant and is used as vegetable in salads , is deep fried or stir fried and often pickled. It is fibrous , has a crunchy texture with mildly sweet , water chestnut like flavor . Cut sections reveal a visually appealing display of symmetrically arranged air canals (holes) traversing all along the length of the root. Lotus roots have been found to be rich in dietary fibre, vitamin c, potassium, thiamine, riboflavin, vitamin B6, phosphorus, copper , and manganese, while very low in saturated fat.  

We can make many healthy and delicious dishes using such less known or probably it would be right to say, the forgotten ingredients. Next, i would love to try my hands on Karunai Kizhangu Masiyal , a healthy and delicious South Indian yam mash from my co-blogger, Priyas's space.                              


Preparation Time: 5 minutes 

Cooking Time: 10 minutes

Serves: 2

Ingredients:

250 grams lotus stem / Kamal Kakdi

2 tablespoon cornflour

2 green chilies, finely chopped

8-10 garlic cloves, minced

1/2 cup finely chopped colored bell peppers

2 tablespoon oil + for deep frying

1 tablespoon black pepper powder

1 tablespoon toasted sesame seeds

Salt to taste

Method:

  1. Wash the lotus stem thoroughly under running water.
  2. Peel it using a vegetable peeler.
  3. Slice into equal sized thin roundels.
  4. Wash the roundels in a bowl full of warm water to get rid of  all impurities and mud if any.
  5. Pat dry using a kitchen towel.
  6. Transfer the roundels to a bowl. Add 1 tablespoon cornflour, 1/2 tablespoon black pepper and salt to it and give a good toss.
  7. Heat enough oil in a wok and deep fry the seasoned lotus stem roundels until they become crisp and golden brown in color. It may take 3-4 minutes per batch to fry. Alternatively, you may Air fry the lotus stem roundels at 180 degrees Celsius for 4-5 minutes
  8. Once you have deep fried all the lotus stem, remove excess oil from the wok, leaving behind just 1 tablespoon oil in the wok.
  9. Add minced garlic to it and fry until crisp and golden brown. Reserve 1 teaspoon of this fried garlic for garnishing.
  10. Add finely chopped colored bell peppers.and chopped chilies and stir fry on medium to high flame for 1-2 minutes.
  11. Lower the flame and add the sauces, red chili sauce, tomato sauce and soy sauce to it and give a quick stir.
  12. Take remaining 1 tablespoon cornflour in a bowl with little water and make a lump-free slurry. Pour this slurry into the bell pepper sauce mixture and cook while continuously stirring.
  13. Next, tip in our deep fried lotus stem and season with salt and remaining black pepper powder. Mix lightly so as to coat the sauces very well with the lotus stem.
  14. Put off the flame, serve the crispy chili garlic lotus stem in a plate. 
  15. Top it with toasted sesame seeds and our reserved deep fried garlic. You may also use spring onion greens for garnishing the dish.


I hope you would love trying out this delicious Crispy Chili Garlic Lotus Stem. If you do so, feel free to share your feedback with us in the form of likes and comments in the section below this post.

All your suggestions are more than welcome. If you like my work, and feel that it is worth following, do hit the follow button on the top right corner of this blog. Your appreciation means a lot to me. It gives me the inspiration and motivation to keep doing my work and give my best each time.

If you like my work and want to be updated with new recipes, do follow us on various social media platforms. My social media handles for your kind reference are as follows. 


You Tube Channel English : 

https://www.youtube.com/channel/UCasKW9Cq5khnTS3JnJ43m2A 

You Tube Channel Marathi

 : https://www.youtube.com/channel/UC5lWdtDq45pDz04dJeezw7A

You Tube Channel Hindi 

https://www.youtube.com/channel/UC3BoiHHEbhS8gIfeRzPfb7w

Facebook Handle: https://www.facebook.com/poonambachhavblogspot

Instagram Handle: https://www.instagram.com/poonambachhav/

Pinterest Handle : https://in.pinterest.com/poonambachhav/

Twitter Handle: https://twitter.com/poonampagar_B


See you soon with yet another healthy and delicious creation from my Kitchen. Until then Stay safe and eat right !


Happy Cooking !

Happy Eating !


Regards

Poonam Bachhav 


Related Posts:


Monday, 21 February 2022

Grilled Paneer Recipe


Grilled Paneer is a healthy and delicious Indian cottage Cheese snacks. Paneer cubes are marinated in homemade marinade and grilled either in an oven or pan to get  juicy flavorful Paneer with golden brown marks on it. Grilled Paneer makes a guilt-free snacks and you can serve it with some salad, ketchup, or any chutney / dip of your choice. It tastes great even by itself with a lemon wedge and some chat masala sprinkled just before serving. 


Grilling involves cooking food on a rack over a heat source, usually a charcoal fire or ceramic briquettes heated by gas flames. Direct heat quickly sears the outside of the food, producing a distinctive robust, roasted and sometimes pleasantly charred flavors and a nice crust.

Dietary Notes: Grilled Paneer is

  • Vegetarian snacks
  • Healthy and flavorful
  • Guilt-free as required very little oil
  • Has a simple fuss-free recipe
  • Diabetic friendly
  • Gluten-free
  • Serves as a delectable party starter / appetizer
  • Kid friendly
  • Makes a delicious finger food for babies and toddlers.
  • Figure friendly
Short Video for Grilled Paneer 


Preparation Time: 30 minutes

Cooking Time: 10 minutes

Serves: 6

Ingredients: 

200 grams Paneer / Indian Cottage Cheese

2 tablespoon thick curd

1 tablespoon gram flour / Besan

1 teaspoon Kashmiri red chili powder

1 teaspoon roasted cumin coriander powder

1/2 teaspoon garam masala

1/2 teaspoon black pepper powder

1/2 teaspoon amchur powder

2 tablespoon oil

Handful of fresh coriander leaves, finely chopped

Salt to taste 

Method:

  1. Cut paneer to desired size and shape. I have cut the paneer slab into large cubes.
  2. In a bowl add the yogurt. spice powders, salt , gram flour and finely chopped coriander leaves and give it a good mix.
  3. Add the paneer cubes and coat well with the marinade.
  4. Cover and allow the paneer to marinate for 30 minutes at room temperature , or in refrigerator preferably overnight so that the flavors infuse very well into the paneer.
  5. When ready to serve , rush with little oil and either grill it in an oven or in a grill pan over gas top or in a grilled sandwich maker until it is golden brown from all sides.
  6. Do not over grill, or else it will become chewy.
  7. Serve the grilled paneer with some salad, lemon wedge and a dip or chutney of your choice.


Would love to hear from you !

I hope you would love trying out this healthy and delicious Grilled Paneer. If you do so, feel free to share your feedback with us in the form of likes and comments in the section below this post.

All your suggestions are more than welcome. If you like my work, and feel that it is worth following, do hit the follow button on the top right corner of this blog. Your appreciation means a lot to me. It gives me the inspiration and motivation to keep doing my work and give my best each time.

If you like my work and want to be updated with new recipes, do follow us on various social media platforms. My social media handles for your kind reference are as follows. 


You Tube Channel English :

 https://www.youtube.com/channel/UCasKW9Cq5khnTS3JnJ43m2A 

You Tube Channel Marathi :

 https://www.youtube.com/channel/UC5lWdtDq45pDz04dJeezw7A

You Tube Channel Hindi : 

https://www.youtube.com/channel/UC3BoiHHEbhS8gIfeRzPfb7w

Facebook Handle: https://www.facebook.com/poonambachhavblogspot

Instagram Handle: https://www.instagram.com/poonambachhav/

Pinterest Handle : https://in.pinterest.com/poonambachhav/

Twitter Handle: https://twitter.com/poonampagar_B


See you soon with yet another healthy and delicious creation from my Kitchen. Until then Stay safe and eat right !


Happy Cooking !

Happy Eating !


Regards

Poonam Bachhav 


Related Posts:


Monday, 14 February 2022

Homemade Chocolate Recipe


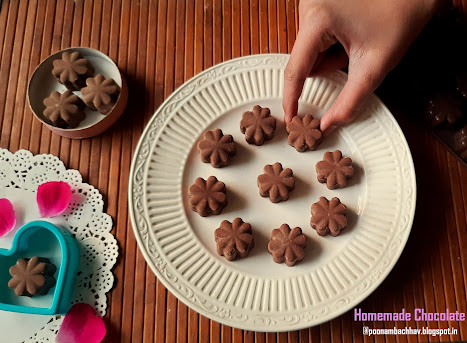
Homemade chocolates make a delightful edible gift for your loved ones. With this quick and easy to follow, no-cook recipe that uses just 4 ingredients, its a breeze to make chocolates at home from scratch. You do not require any fancy ingredient like chocolate or milk compound, coconut oil etc nor any double boiler method to melt the chocolate. 


What goes into my version of Homemade Chocolate ? The Ingredients:

As mentioned above, this homemade chocolate recipe, does not call for use of any fancy ingredients like compound chocolate or milk chocolate. It is a pretty simple recipe that uses just 4 ingredients that are easily available in most of the Kitchen pantries. Moreover, this is a no-cook recipe and the chocolate is ready within 45 minutes from scratch. Let's have a look at the ingredients, one by one.
  • Unsweetened Cocoa Powder : Use good quality unsweetened cocoa powder for best results. The taste of your chocolate will depend upon the cocoa powder you use to make it. 
  • Milk Powder : Use a good quality dairy whitener.
  • Powdered Sugar : Use icing sugar if you have for best results. If using powdered sugar, sift it thrice before using.
  • Melted ghee / Butter : For a vegan version use coconut oil.
  • Vanilla Essence : Optional, but recommended for a lovely flavor.
All you require is just a blender jar to blend all the ingredients together. The resultant creamy melted chocolate is poured into silicon molds and refrigerated for 35-40 minutes and your delectable homemade chocolates are ready to serve !


Short Video for Homemade Chocolate 
                             

Preparation Time: 45 minutes
Cooking Time: Nil
Serves: 1 dozen chocolates

Ingredients: Measurements used : 1 cup = 240 ml
  • 1/3 cup Milk powder
  • 6 tablespoon Powdered Sugar
  • 1/4 cup melted butter /ghee
  • 2 tablespoon unsweetened cocoa powder
  • Vanilla essence (optional)
Method:
  1. Transfer sifted powdered sugar,milk powder and cocoa powder to a grinder jar and pulse it to b;lend the dry ingredients.
  2. Add melted butter and few drops of Vanilla essence to it and lend again until you get a creamy rich melted chocolate.
  3. Pour the chocolate into each cavity of silicon mold. Tap the mold and place it in refrigerator to set for around 40 minutes.
  4. Un-mould it and enjoy a delightful treat with your loved ones !


Would love to hear from you !

I hope you would love trying out this delicious Homemade Chocolate. If you do so, feel free to share your feedback with us in the form of likes and comments in the section below this post.

All your suggestions are more than welcome. If you like my work, and feel that it is worth following, do hit the follow button on the top right corner of this blog. Your appreciation means a lot to me. It gives me the inspiration and motivation to keep doing my work and give my best each time.

If you like my work and want to be updated with new recipes, do follow us on various social media platforms. My social media handles for your kind reference are as follows. 


You Tube Channel English :

 https://www.youtube.com/channel/UCasKW9Cq5khnTS3JnJ43m2A 

You Tube Channel Marathi : 

https://www.youtube.com/channel/UC5lWdtDq45pDz04dJeezw7A

You Tube Channel Hindi :

 https://www.youtube.com/channel/UC3BoiHHEbhS8gIfeRzPfb7w

Facebook Handle: https://www.facebook.com/poonambachhavblogspot

Instagram Handle: https://www.instagram.com/poonambachhav/

Pinterest Handle : https://in.pinterest.com/poonambachhav/

Twitter Handle: https://twitter.com/poonampagar_B


See you soon with yet another healthy and delicious creation from my Kitchen. Until then Stay safe and eat right !


Happy Cooking !

Happy Eating !


Regards

Poonam Bachhav 


Related Posts:


Monday, 7 February 2022

Chocolate Sandwich Recipe


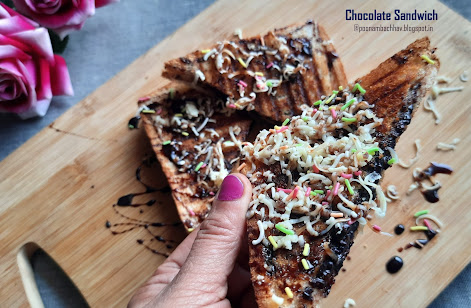
Chocolate Sandwich is a delectable grilled sandwich with unique and melt-in-mouth combination of cheese and dark chocolate. With a very quick and easy to follow recipe, chocolate cheese Sandwich can be served at breakfast, packed in Kid's lunch box or served as a delicious snack any time of the day. Chocolate Sandwich is also one of the popular street foods of Mumbai. If you are a chocolate lover, you are surely going to like this delightful chocolate cheese sandwich.

With the ongoing Valentine's week , you can make these chocolate cheese sandwiches on chocolate day as well. I have shared the methods of making this chocolate cheese sandwich both on stove top as well as using Sandwich maker.


What goes into my version of Chocolate Sandwich ? / The ingredients:

This is a very simple chocolate sandwich which can be made in a jiffy and does not call for any fancy ingredients. It is so simple that even,kids can make it on their own with little supervision. All you require is
  • Dark chocolate : You can use any dark chocolate, cooking chocolate in this recipe. I have used Morde dark compund. You just have to grate or chop the chocolate. Some recipes call for heating the chocolate in a double boiler with butter and then using it as spread.
  • Cheese : I have used processed cheese slices in the sandwich and cheese cube in the grated form for garnishing.
  • Butter: I have used salted butter as a spread over the bread slices. You may use unsalted white butter or skip it al together.
  • Bread : You can use any variety of bread to make chocolate sandwich.
  • As mentioned above I have used chocolate syrup to drizzle on the sandwich for that extra chocolaty flavor. This is also optional.
                    

Dietary Notes: The Chocolate Cheese Sandwich is 
  • Kid friendly
  • Easy to make
  • Serves as a quick breakfast
  • Makes a wonderful lunch box option
  • Delectable
  • Vegetarian dessert
  • Healthy snacks for kids
  • Wonderful variation to reqular savory sandwiches.
Short Video for Chocolate Sandwich 
                   

Preparation Time: 5 minutes
Cooking Time: 5 minutes
Serves: 2

Ingredients:
  • 4 bread slices
  • 1 tablespoon Butter or as per need
  • 1/2 cup dark chocolate or as per need (grated or chopped)
  • 2 processed cheese slices
  • 1 processed cheese cube
For garnishing (optional)
  • Grated processed cheese\
  • Chocolate syrup
Method:
  1. Apply butter on 2 bread slices.
  2. Spread generous amount of grated chocolate over one buttered slice.
  3. Place a cheese slice over it.
  4. Again spread chopped chocolate over the cheese slice.
  5. Cover the sandwich with the other buttered bread slice.
  6. Make the other sandwich also in the similar manner .
  7. Heat a grilled pan over low to medium heat . Add butter to it and place or assembled chocolate sandwich over it. Allow it to cook on low flame until crisp and golden brown from bellow.
  8. Delicately flip the sandwich and cook from other side as well.
  9. If making the sandwich using a sandwich maker, preheat the sandwich maker.
  10. Place the assembled sandwich over it.
  11. Close the sandwich maker and allow the sandwich to grill for 3-4 minutes.
  12. Cut the grilled sandwiches into desired shape.
  13. Serve immediately or garnish it with grated cheese and drizzle some chocolate syrup over it.
  14. Enjoy the delightful melt-in-mouth chocolate cheese sandwich with your loved ones !


Variations:
  • You may melt the dark chocolate with some butter in a double boiler and use it as a chocolate spread over the bread slices.
  • You may stuff the chocolate sandwiches with chopped or slivered nuts of your choice.
  • You may use nutella as a chocolate spread on the bread slices.

Would love to hear from you !

I hope you would love trying out this healthy and delicious Chocolate sandwich. If you do so, feel free to share your feedback with us in the form of likes and comments in the section below this post.

All your suggestions are more than welcome. If you like my work, and feel that it is worth following, do hit the follow button on the top right corner of this blog. Your appreciation means a lot to me. It gives me the inspiration and motivation to keep doing my work and give my best each time.

If you like my work and want to be updated with new recipes, do follow us on various social media platforms. My social media handles for your kind reference are as follows. 


You Tube Channel English :\

 https://www.youtube.com/channel/UCasKW9Cq5khnTS3JnJ43m2A 

You Tube Channel Marathi :

 https://www.youtube.com/channel/UC5lWdtDq45pDz04dJeezw7A

You Tube Channel Hindi : 

https://www.youtube.com/channel/UC3BoiHHEbhS8gIfeRzPfb7w

Facebook Handle: https://www.facebook.com/poonambachhavblogspot

Instagram Handle: https://www.instagram.com/poonambachhav/

Pinterest Handle : https://in.pinterest.com/poonambachhav/

Twitter Handle: https://twitter.com/poonampagar_B


See you soon with yet another healthy and delicious creation from my Kitchen. Until then Stay safe and eat right !


Happy Cooking !

Happy Eating !


Regards

Poonam Bachhav 


Related Posts:


Thursday, 3 February 2022

Flax Seeds Mouth Freshener / Ayurvedic Mukhwas


Flax seeds mouth freshener / Alsi Mukhwas is flavorful, delicious and appetizing with healthy goodness of power-packed seeds like Flax Seeds, Sesame Seeds, Fennel Seeds and Carom seeds. This digestive mouth freshener is one of the easiest ways to include power packed seeds in our daily diet. 2 teaspoon of this multi-seed mouth freshener can be taken twice a day as an after-meal snacks.


What is a Mukhwas or Mouth Freshener ?

Mukhwas is an after-meal snacks or a digestive aid that is widely used as a mouth freshener. Mukhwas has nothing to do with mint sprays that are commonly associated with mouth fresheners. It basically contain various nuts and seeds like, fennel seeds, sesame seeds, carom seeds, coconut shreds, cloves, cardamom  etc . Indian meals are heavy in nature as they are divided into multiple courses and hence mukhwas becomes an essential part of the meal, that is served usually after desserts and acts both as a digestive aid after a heavy meal and also as a mouth freshener. Mukhwas is also served in several Indian restaurants, the common one being paan (sweet stuffed betel nut leaf).


What goes into Flax Seeds Mouth Freshener ?The Ingredients:

This is a simple multi seed mouth freshener which is both flavorful and appetizing. Let's have a look at its ingredients one by one.

  • Flax seeds: The key ingredient of this mouth freshener is  Flax seeds. Flax seeds are called as Alsi in Hindi and Javas in Marathi Language. Flax Seeds are very high in fiber and provide good amount of protein. They are also a rich source of heart healthy Omega 3 fatty acids. Flax seeds add a wonderful crunchy flavor and nutty taste to the Mouth Freshener.
  • Sesame Seeds / Til: Sesame seeds are calcium, protein and iron rich tinny seeds with a characteristic nutty flavor. benefits of sesame seeds include ability to improve heart health, lower blood pressure, build strong bones, manage diabetes, improve digestion and aid in dental care.
  • Fennel Seeds / Saunf : One of the most common ingredients used in mouth fresheners is roasted fennel seeds or saunf. These seeds are aromatic and flavorful and lend a mild sweet taste to the mukhwas. Apart from that they also have anti-bacterial compounds that kills and destroys bacteria, fungi and yeast buildup in the mouth.
  • Carom seeds: Also known as Ajwain, carom seeds have powerful antibacterial and antifungal properties. It is believed to lower blood pressure and improve cholesterol levels. It is also believed to fight against peptic ulcers and relives indigestion.
  • Rock salt and black salt are flavor-ants of this mukhwas. They are dissolved in
  • Lemon juice and used to flavor the mukhwas. 


Short Video for Flax Seeds Mouth Freshener


Related Event: Stick to seeds @Shhhhhhh Cooking Secretly Challenge

Archana di was the host and proposed cooking with seeds as the theme or the month of February on our Facebook Gourmet group, Shhhhhhh Cooking Secretly challenge. Archana di is a versatile cook and you will find many easy-to-do healthy and delicious recipes on her space, The Mad Scientists Kitchen. You might want to checkout her latest upload on Kachya Dinkachi Pud , a powder made from healthy goodness of edible gum and nuts that can be had daily in moderate quantity along with a glass o milk at bed time. Participating bloggers work in pairs on this group. A set of secret ingredients is exchanged between the pairs and a dish is cooked as per the theme o the month. My partner or the theme was multi-talented Jayashree who gave me black salt and sesame seeds as my secret ingredients using which i made this healthy and flavorful Mukhwas. In return i gave her Bengal gram and lemon juice as her secret ingredients and she made very healthy Quinoa Upma  using her set of secret ingredients.


Dietary Notes: Flax Seeds mouth Freshener is
  • Appetizing Mouth Freshener
  • Healthy and Flavorful
  • Helps in digestion
  • Vegan After-meal snacks
  • Gluten-Free
  • Power Packed
  • Easy to make
  • Easy on your pocket


Preparation Time: 5 minutes

Cooking Time: 10 minutes

Ingredients:

  • 250 grams Flax Seeds / Alsi / Javas
  • 50 grams Fennel Seeds / Saunf
  • 50 grams Carom Seeds / Ajwain
  • 50 grams Sesame Seeds / Til
  • 1/2 teaspoon Rock salt 
  • 1/2 teaspoon Black salt
  • Juice of 1 lemon
Method:
  1. Dry roast the flax seeds in a heavy bottom sauce pan or skillet on low to medium flame until the seeds pop. Keep stirring so that the seeds do not catch the bottom.
  2. Remove the Flax seeds on to a plate . In the same pan dry roast rest of the seeds one by one.
  3. Remove all the roasted seeds in one container and mix them
  4. In a small bowl take 1/4 cup water. Squeeze juice of 1 lemon into it. Add rock salt and black salt to it and mix well.
  5. Transfer all the roasted seeds back to the same pan and put on the flame. 
  6. Add the slurry of lemon juice and salts to the seeds and roast again on low to medium flame while stirring continuously.
  7. Make sure no lumps are formed and the seeds get toasted very well. It will take 4-5 minutes on low to medium flame. 
  8. Our multi-seed mouth freshener is ready to serve.
  9. Put off the flame and allow the seeds to cool down completely before storing it in an air-tight container.


Would love to hear from you !

I hope you would love trying out this healthy and delicious Flax Seeds Mouth Freshener. If you do so, feel free to share your feedback with us in the form of likes and comments in the section below this post.

All your suggestions are more than welcome. If you like my work, and feel that it is worth following, do hit the follow button on the top right corner of this blog. Your appreciation means a lot to me. It gives me the inspiration and motivation to keep doing my work and give my best each time.

If you like my work and want to be updated with new recipes, do follow us on various social media platforms. My social media handles for your kind reference are as follows. 


You Tube Channel English :

 https://www.youtube.com/channel/UCasKW9Cq5khnTS3JnJ43m2A 

You Tube Channel Marathi :

 https://www.youtube.com/channel/UC5lWdtDq45pDz04dJeezw7A

You Tube Channel Hindi :

 https://www.youtube.com/channel/UC3BoiHHEbhS8gIfeRzPfb7w

Facebook Handle: https://www.facebook.com/poonambachhavblogspot

Instagram Handle: https://www.instagram.com/poonambachhav/

Pinterest Handle : https://in.pinterest.com/poonambachhav/

Twitter Handle: https://twitter.com/poonampagar_B


See you soon with yet another healthy and delicious creation from my Kitchen. Until then Stay safe and eat right !


Happy Cooking !

Happy Eating !


Regards

Poonam Bachhav 


Related Posts:


poonambachhav.blogspot.com